08 Oct 2015
Sometimes you struggle for a long time to learn something, and you don't feel like you've really made much progress. But when you learn something new and somewhat similar to it, the learning curve is greatly reduced. It's a great feeling. That's what happened with me recently when I tried to learn Laravel for a work project. Because of the time I spent with Rails, it made learning Laravel so much easier! Laravel is a MVC framework for PHP very similar to the way Rails is for Ruby.
Because a lot of the concepts are similar, I created a chart of equivalent syntaxes that could get someone who is already familiar with Rails started in Laravel much quicker.
| Laravel |
Rails |
| composer install (or php composer.phar install) |
gem install |
| composer create-project laravel/laravel your-project-name |
rails new your-project-name |
| composer.json |
Gemfile |
| composer.lock |
Gemfile.lock |
| packagist.org |
rubygems.org |
| blade |
erb or haml |
| Eloquent |
ActiveRecord |
| php artisan serve |
rails serve |
| php artisan make:controller PagesController |
rails generate controller Pages |
| php artisan make:model Article |
rails generate model Article |
| php artisan make:migration add_column_to_table |
rails generate migration AddColumnToTable |
| php artisan migrate |
bundle exec rake db:migrate |
| php artisan tinker |
rails console |
| php -a |
irb |
| php artisan route:list |
bundle exec rake routes |
Overall, I really love Laravel. In fact, I think I like Laravel more than Rails (while I still like Ruby way more than PHP). There are obviously a lot of similarities to Rails, and you can't take away the fact that Rails changed the landscape and paved the way for Laravel. But there are also many things that are different as well, and make Laravel really shine. I'll try to write about those in a future post.
Meanwhile, here are a few shout-outs:
- Udemy's RoR Tutorial: Learn from Scratch I was turned onto this tutorial by Molly Elizabeth, who works at Udemy. I haven't gone through the tutorial myself, but it looks like a very good resource if you're just starting out in Rails. If you try it, let me know what you think.
- PHP: The Right Way a very good 10,000 feet birds eye view of the somewhat gnarly PHP scene. It's not the prettiest language, but recent iterations have been able to salvage it a bit. This site is a super useful resource if you have to do PHP, and it covers best practices, how to organize your code, pitfalls you can avoid, etc.
- Laracast these video tutorials are clear, concise, and very useful when learning Laravel. Jeffrey is a really good teacher and communicator, and he covers the topics at just the right speed. Highly recommended.
- Craft CMS I've been working with ExpressionEngine for a while, and while very powerful, it is still a bit frustrating and inflexible at certain things. Craft was designed by people who used to design plugins for ExpressionEngine, so they know all the painpoints and they have been able to create a really amazing product. Check it out if you're looking for a really well thought-out CMS.
- DigitalOcean paired with ServerPilot. Setting up your stack can't be simpler than with these two tools working together. DigitalOcean provides the servers on the cloud and ServerPilot gives you a really nice control panel to configure them. And the interface of both sites are simple and elegant, and much less headache-inducing than AWS.
- ... speaking of which, if you have to deal with AWS, here's a really great resource: AWS in Plain English. It comically translates AWS services into what they should have been named in the first place. Nice intuitive names rather than EC2 or S3.
18 Apr 2015
Many books and tutorials are designed around building out one feature from the ground up and then moving on to the next one. While I admire that kind of workflow where you focus on creating working tangible features, I also noticed that for almost every feature, the programmer would have to touch the model, controller, and view. That kind of moving back and forth makes it hard to really understand the structure of the app, at least for me. So I decided that for my next app, I was going to do an experiment.
Instead of developing each feature, I developed all the models up front. This allowed me to really think about the data structure behind my app and how each part interacts with the whole. I also aimed to do test driven development, by writing tests for each model and their associations before moving onto the next model. The downside of this approach is that by the end of this experiment, I still didn't have one tangible feature, at least not from the user's standpoint. And of course designing the models up front doesn't mean I won't have to change them later when I realize the constraints have changed. But I think it's a good learning experiment, allowing me to not worry about the controllers or views at all, and just focus in on how to connect all the different pieces.
My App
I love the site Goodreads. It's a social network around books. At the core of the app are the following features:
Around Books
- users have shelves and can create new shelves and can add books to their shelves
- users can read books and update the status of what they've read
- users can review and rate books
Around Users
- users can friend each other creating a 2 way relationship
- a user can follow another user, creating a 1 way relationship
- users can like or comment on another user's reviews or statuses
There's much more to it, but those are the very core features. Since I love Goodreads and there are a few things I'd like to change about it, I decided to make my next app be a Goodreads clone. I think part of the reason I could design the complete model first is because I'm so familiar with the existing site and know beforehand exactly how each part is supposed to work. That said, I did make a few changes in my version, which I will talk about later.
The End Result
I'm going to start by showing you what I ended up with, and then explain some of the choices I made. The amazing Wendy Beth told me about the Rails ERD gem which will "allows you to easily generate a diagram based on your application's Active Record models". Here is my ERD (entity relationship diagram):
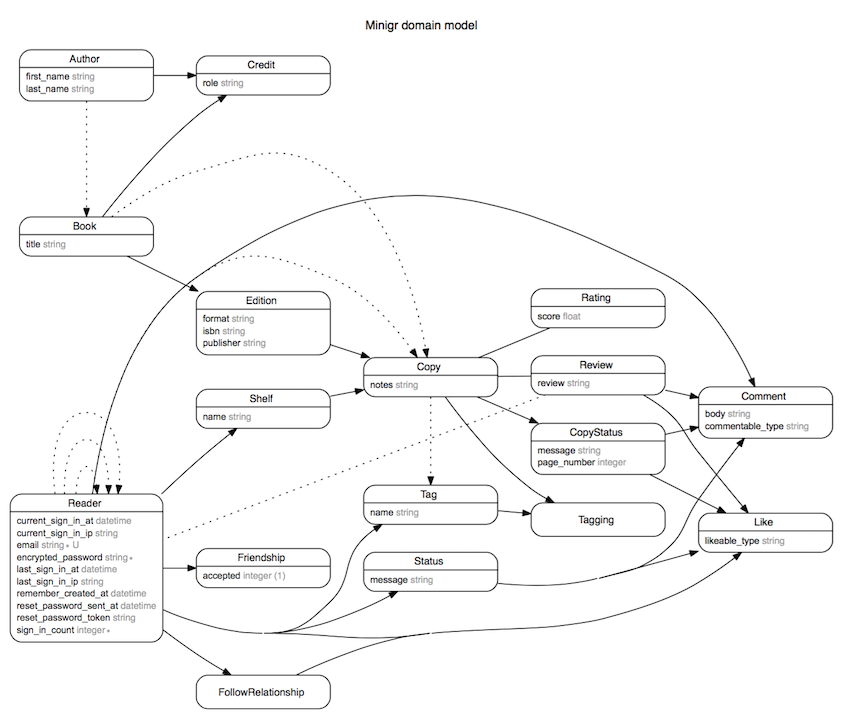
What follows isn't a complete step-by-step tutorial on what I did, but rather a few highlights (or lowlights, depending on how you see it) of my experience building this out.
Associations and Shoulda
A huge part of this exercise was figuring out how to work with rails associations. You know, those has_many and belongs_to calls that magically link up your models so that you can simply call school_of_the_sun.editions instead of having to write out complicated sql joins (that's the last book I read and loved by the way). I won't go over the basic associations, as I think the documentation is not bad. However, I will talk about some of the more tricky associations that I ended up implementing.
One challenge in terms of associations is testing them. Luckily, there is a gem out there for that. It's called Shoulda and it's really easy to use. I first learned about it in Michael Hartl's Rails Tutorial, but I quickly forgot about it.
One of the challenges when reading that book without any prior experience was that it presented all these different concepts together, so that I didn't understand which commands were part of Rails and which were part of Ruby. Similarly, what is part of RSpec and what has been added to it by Shoulda? Over time, much of this has cleared up.
Here are a few examples of Shoulda at work:
Spec.describe Book, type: :model do
  it { should have_many(:authors).class_name('Author') }
  it { should have_many(:editions).class_name('Edition') }
  it { should have_many(:copies).class_name('Copy') }
end
Goodreads doesn't have tags. Instead they have shelves. But it's a bit confusing, because they have two types of shelves. The first type are exclusive shelves. A user must add a book to one and only one exclusive shelf. Examples of exclusive shelves are "read", "to read", and "currently reading". A book cannot be both "to read" and "currently reading" because that doesn't make sense.
The second type of shelf is just a shelf that acts more like a category. You can add a book to as many non-exclusive shelves as you'd like. Examples would be "travel", "romance", "books with blue covers", etc.
Lastly, each user defines his or her shelves, and gets to set which shelves are exclusive and which non-exclusive.
When it came to implementing my solution, I thought having the same name and 2 different behaviors was confusing. So I created two separate models. One is the shelf model, which acts like Goodread's exclusive shelves. And one is the tag model, which acts more like tags do on the rest of the web (and kind of like Goodread's non exclusive shelves).
Shelves were the simpler of the two. A shelf has_many copies (the concept being that you don't own a book, you own a copy of a book). And a copy belongs_to a shelf.
Tags were a little more complicated. I ended up creating an intermediate Taggings model so that each copy can have many tags and each tag can have many copies. This Railscast tutorial explains what I did pretty well.
Aliasing a has_one relationship
I want reviews to have_one reviewer, but the name of the class is Reader not Reviewer. And it has to go through several relationships to get there. I could have settled for review.reader, but I wanted my names to be more accurate. After much experimentation, here's what I ended up with:
has_one :reviewer, through: :copy,
                   source: :reader,
                   class_name: "Reader",
                   foreign_key: :reader_id
A reader can like a review or a following or a status. A reader may also comment on reviews and statuses. I would like to have just one Like model and one Comment model instead of several different ones tied to different tables. For example, I could do ReviewLike, FollowLike, and StatusLike. But that's so inelegant, and whenever I want to add the capability to like something else, I would have to write a whole new model and migration for it.
Instead, I decided to use polymorphic associations. It's a great solution for this situation, I think! Basically a polymorphic association allows you to use one model (Like in this case) and bind it with two or more models through a foreign key and a type (which tells the model which model to bind it to in each case). So when I like a review, that type will be "Review" and when I like a status that type will be "Status". Comments work the same way.
Reader Statuses vs. Copy Statuses
On Goodreads, a user can enter a general status update. This is like "Hey I'm having a great day." and is not tied to a book. But they can also enter a status update on a book. This is like "Hey I'm reading 'Wittgenstein's Nephew' by Thomas Bernhard and I'm on page 47 and here are my thoughts...". The second type of status update is tied to a user's book (copy model in my case) and can include a page number to show progress. Other than that, the two statuses are the same.
So I really wanted an elegant solution here instead of creating two separate models. I read up on single table inheritance which seems like a really cool use of inheritance to not repeat code. I wasn't sure this would be the right solution because copy status has two extra data fields. But I liked the idea that a copy status is basically just a status with extra functionality, so therefore it inherits from it. So I decided to implement it.
And I'm glad I did--now I understand why STI is the wrong solution in this case. I had to rollback and start again. The problem in this case is that CopyStatus not only has 2 extra fields, but one of them is a foreign key field that references copy whereas Status has no foreign key fields. This represents not only difference in data, but also difference in behavior. While I think it could still work, this has gone from a somewhat elegant solution to a total hack. It's even less elegant than the two models I started with.
Friendships
While following is a one-way relationship (you can follow someone but they do not have to follow you back), friendships are a two-way relationship. You both agree to be friends.
If we imagine a friends table with "friender" and "friendee" as the two columns, and a friendship is basically any two users that are referenced in this table then...
This poses an interesting problem in that when I say Demetrius.friends I want the model to return all of Demetrius's friends. That means everyone in the friender column where friendee is Demetrius and everyone in the friendee column where Demetrius is the friender.
Luckily, I found a Railscast that showed two ways of doing this. One uses a gem and one a self-rolled solution. I avoided the gem because the self-rolled version seems just as simple and easier to customize (less dependencies, too).
For my purposes, I also have to think about the fact that a friend has to request someone to be their friend, then that person has to agree before the friendship becomes official. I added an accepted field to the table for this purpose. I'm not sure if this will be sufficient or if I'll have to create a separate FriendRequest model, but I will find out soon when I try to implement it.
Alternatives?
So these are the basic models and relationships between them that I've come up with. Could they be different? Are there better ways of modelling this? Probably, but I won't find out until I implement it. (Feel free to give your thoughts in the comments section)
One thing I thought of that could be different is whether or not I needed the copy model. What if I got rid of it? Well then the problem becomes, how does one Edition has_many Readers (through shelves) as well as one Reader has_many Editions? Someone suggested a has_and_belongs_to_many association here as a possible solution.
Another thing I'm wondering is if I could get rid of the rating and review classes. Since they belong to copy, could I just have rating and review as fields in Copy? Do I lose something from doing that?
Other Things Learned
I learned that I really like thinking about models and focusing on them exclusively, at least in the beginning. I also made some big mistakes that I will not make again. One is that the model-database connection is not automatically in sync. When I was testing this I was running into some weird problems. I finally figured out that just because I updated something from one model does not mean all the other models have updated from that same set of data in the database automatically. I have to reload the model in order for it to fetch that data again from the database.
The Future
I definitely want to start building out the controllers and views and start making this actually work and look good! My models aren't complete. There are others I need to add eventually, as well as many fields and things like validation that I need to add. But for now it is a good big-picture where I can get started building. There will likely be many challenges in the future and my models will probably have to change and adapt, but that's all part of the process!
31 Mar 2015
This past weekend I went to my very first code retreat! "What is a code retreat?" you may be asking yourself. Don't worry, I didn't know what it was either until very recently. Here's an intro from the event's sign up page:
Coderetreat is a day-long, intensive practice event, focusing on the fundamentals of software development and design. By providing developers the opportunity to take part in focused practice, away from the pressures of 'getting things done', the coderetreat format has proven itself to be a highly effective means of skill improvement. Practicing the basic principles of modular and object-oriented design, developers can improve their ability to write code that minimizes the cost of change over time.
More specifically, individuals are are grouped into teams of two and each team “solves” a common problem, 'The Game of Life'. There are 6 sessions throughout the day and for each session the groups are reorganized and the code deleted. After each session there are session reflections to help with the internalization of lessons.
It's basically a day of learning and exploring with awesome people and no judgment. So pretty much the best thing ever.
The event I went to was hosted at Big Nerd Ranch and lead by Kylie Stradley and Stafford Brooke, and also sponsored by Mandrill and Mailchimp.
After a breakfast of gourmet donuts, Kylie introduced us to the problem we were to solve for the rest of the day: The Game of Life. The game explores the complexities that arise from a set of very simple rules. And because of its simple rules, it makes for a great software design exercise.
The point was not to write working code, but to explore different possible ways of writing it. The fun came in the variation of solutions, and the explorations of the pros/cons of each.
It reminded me of an exercise I gave myself when I was first exploring the beauty and subtlety of writing. The exercise was simple: pick any sentence and write it 20 or 30 different times using different sentence structures, wording, punctuation or grammar without changing the primary meaning. For example, the sentence "The quick brown fox jumps over the lazy dog." could also be written as:
Being quick, the brown fox jumps over the lazy dog.
The lazy dog was jumped over by the quick brown fox.
Because the fox is lazy, the quick brown fox jumps over him.
The fox (quick and brown) jumps over the lazy dog.
Over the lazy dog the quick brown fox jumps!
(This was the type of fun I had in high school hahaha) The other part of this exercise, and arguably the more important part, is to take each sentence and analyze it for how it differs from the original in terms of tone, voice, connotation, emphasis, meaning, etc. I say this is the more important part of the exercise because reflection leads to awareness and understanding of what each tweak does to the original. This kind of obsession eventually lead me to become a poet, so if this looks fun to you: beware! A life of agonizing over words awaits you.
Code retreat reminded me of doing this same exercise, but with code! We were given just enough time to formulate a solution, without enough time to finish or perfect it. That way, we weren't expected to finish anything, and so we could concentrate on issues of design.
We paired with a new person for each session, and by the end of the day we would have paired with almost everybody in the room. For each session, we were also expected to practice test driven development (this made it even harder to complete in 45 minutes, but added the dimension of very intentional forethought and planning).
Many of us had never tackled the game of life problem before, so the first session was basically dedicated to getting comfortable with the problem space. But with each subsequent session, we were given new constraints. Imagine if doing the sentence exercise above, I had given myself rules for each sentence, like "must use a passive verb" or "must have a dependent clause". These constraints stretched us and made us think about the problem in a new way.
We had a diverse group of experts and beginners. Rather than try to make everyone program in one language, we were encouraged to learn from each other. Thus, I got to program with a C# programmer, an iOS developer, and someone with JavaScript and Go experience, as well as people who didn't have much programming experience (but rich experiences in other fields).
At the end of each session, we were encouraged to delete our code. This re-inforced the idea that the code was not the goal, but what we learned from designing it. After each session, we also reconvened with the larger group to talk about what we learned and how we approached the problem and share ideas. This part was super helpful and eye-opening, because some teams came up with very unexpected and inventive designs.
One of the things we talked about was whether the logic of the cell living or dying should go into the board or the cell. There were good arguments on both sides, and at the end of the day I had attempted it both ways and am still undecided about which way is better. As with everything, it's a matter of understanding tradeoffs.
Looking Back
If I could do code retreat all over again, I would try not to design the entire game every time. Instead, figure out what the constraint is getting me to reconsider, and only design/program that part. For example, we had a constraint where we couldn't use if statements. The method that it would affect most would be the main logic of the program--whether a cell lives or dies.
But we ended up on several tangents, spending a lot of time talking about other aspects of the program, like different ways of seeding it, or how to find neighboring cells and such. And because we only had 45 minutes, I didn't feel like I got enough time to really explore the main issues of that exercise. If I could do it again, I would have just hardcoded a method that returned the same number of neighbors every time, just so that I didn't have to think about that part, and could focus on the really good parts of that exercise.
Looking Forward
Coderetreat was a great experience, and I loved meeting people in the spirit of learning. Everyone was kind and helpful, and the ideas we shared will continue to help me in my everyday work. But this is just the beginning:
Global Day of Coderetreat is November 15! I'm already looking forward to the next one, and so should you. There is a website where you can look for coderetreats in your area. But if there isn't one, you should organize one! The website provides all the details you'll need to organize your very own.
17 Mar 2015
 Not so long ago, I was learning Git for the first time. I was going through tutorials and picking it up pretty quickly. No big deal, right? I understood the basic concept of version control, and I can type simple commands. The problem is that whenever I used git outside of those tutorials and ideal situations, I got stuck because I didn't understand how it worked behind the scenes.
There are many tutorials that go through the motions of using git without telling you how to think about what's going on. On the other hand, resources that teach you how to think about git aren't nearly as prevalent as those beginner tutorials that teach you what to type. So here are three of the most useful resources that helped me level up on git beyond the very basics.
Think Like a Git
Think Like a Git is a website dedicated to that "aha" moment. Do you think there's something magical about git? There really isn't. It's just that you don't have a mental model of git yet, so everything that happens seems like magic and kind of mysterious. Reading this tutorial was enlightening and really put me on the track of being comfortable with git, even when I messed up and didn't follow a normal workflow.
Git for Ages 4 and Up
In Git for Ages 4 and Up Michael Schwern walks you through adding, committing, pushing, and a whole bunch of other git commands while playing with Tinkertoys! The visual element really makes this a wonderful resource. Unfortunately, the video isn't of the highest quality, and there are a lot of interuptions and tangents. But overall, it's really helpful.
Git Happens
Jessica Kerr @jessitron is a great speaker and in Git Happens, she not only leads us through a few more difficult commands but also helps us understand why git is hard, and why it's worth it. I loved how she talked about how git not only allows you to save your work, but also allows you to tell the story of what you did any way you like. Please note that Jessica actually prefers this version of her talk, but the one above was the one that I originally watched (and I still prefer it).
I haven't really used many of these extensively, but since we're talking about visualizing and mental models, these can come in handy: